run Windows diagnostics provided by the manufacturer
Before wiping clean the Windows OS / malware with which your computer can pre-installed be sure to run any diagnostic tests supplied by the manufacturer in case they are only provided for Windows. In my particular case there were some battery diagnostics which I neglected to run before formatting the drive and so I relied on Linux battery diagnostics.
research how you enter the BIOS
create an Ubuntu 16.04 live USB flash drive using UNetbootin
If, after you've created a couple of live Ubuntu USB flash drives, you are unsure which version is each one do a:
$cat /media/usb-disk/.disk/info… to find out (source).
perform a memory test (before wiping clean the disk in case you have to return it)

… once the "Pass" variable reaches past 100% it will go back to 0% and repeat the test (at which point you can press ESC to exit the test).
Here's a relevant Ask Ubuntu answer (to which I have commented).
Here's another Ask Ubuntu thread that also mentions
(in this answer — to which I have also commented) the
memtester program (sudo apt-get install memtester). I used that as well but it's not practical
(or even outright impossible) to scan using memtester the entire memory as the system becomes very
unresponsive (with all memory being locked by memtester to perform the test). Whereas the memory test of UNetbootin
is run before loading the operating system and any user programs so there the responsivity point is moot. In general, I
think it makes sense to use memtester only when trying to check a particular area of memory (though I haven't tried that).
install Ubuntu 16.04 from the live USB flash drive
test that the wireless network card is working
examine dmesg and syslogs for hardware / BIOS issues
Once you login for the first time you should check the output of the boot process
(which is usually available for you to inspect in /var/logs/dmesg or just by
using the dmesg command).
You should also examine the various system logs in /var/log
(the most important of which is kern.log and syslog)
for anything that might look weird and investigate further. Note in this connection
that in my Ubuntu 16.04 system syslog appears to be a clean superset of kern.log
(see my comment on this answer).
E.g. I would do:
$ cat /var/log/kern.log | grep -i -E "error|crit|emerg|alarm"
$ cat /var/log/syslog   | grep -i -E "error|crit|emerg|alarm"
… or use
-E "error|crit|emerg|alarm|warning" if you want to investigate warnings too.
The various codes are apparently related to the arguments used in syslog API:
$ man syslog | grep -i -E "(conditio|unusable)"This being said, the output is hard to decipher and it's not clear how many of the messages displayed really require action on your behalf. Here's the most relevant Ask Ubuntu answer on this topic.
Visually inspecting the boot process output (which is available in the kernel ring buffer for you to inspect
with dmesg provided clues which were more actionable and worthwhile to follow in my experience.
Using this method I handled the following cases:
- During boot I was getting the following message:
A TPM error (6) occurred attempting to read a pcr value
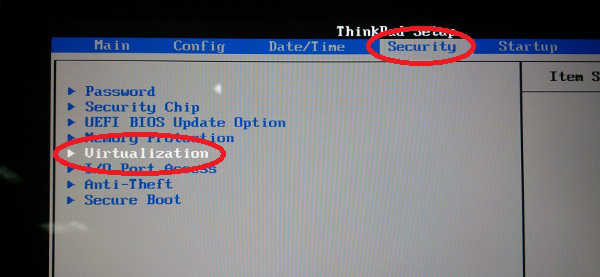
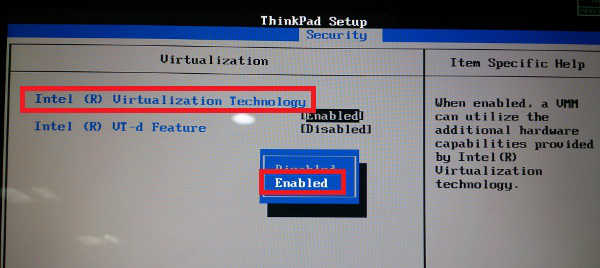
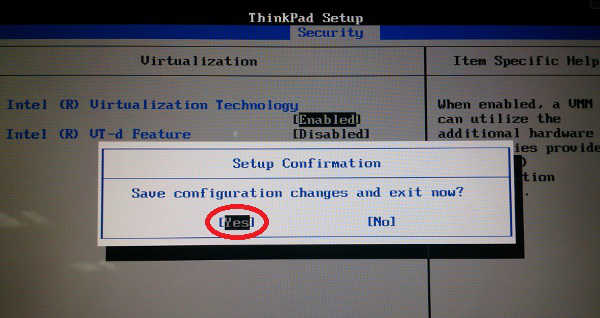
Activating the Security Chip in BIOS (accessible with F1) removed this message. Relevant posts: here and here. - Enable virtualization from the BIOS. During boot I was getting the following message:
kvm:disabled by bios
… this is in fact a warning that even though the processor has KVM support (not to be confused by this use of the same acronym), this ability is turned-off by the BIOS. To fix this problem I had to enable some IBM virtualization technology flag in the BIOS. Relevant links on the subject are here, here and here. Here are some screenshots from the last link (not from my own system but very similar according to my recollections): screen 1, screen 2 and screen 3, Apparently from the latter answer it can be inferred that the following incantation should server to show whether a CPU has kernel virtualization capabilities:grep -E "(vmx|svm)" --color=always /proc/cpuinfo
… and indeed the above produces some output on my system.
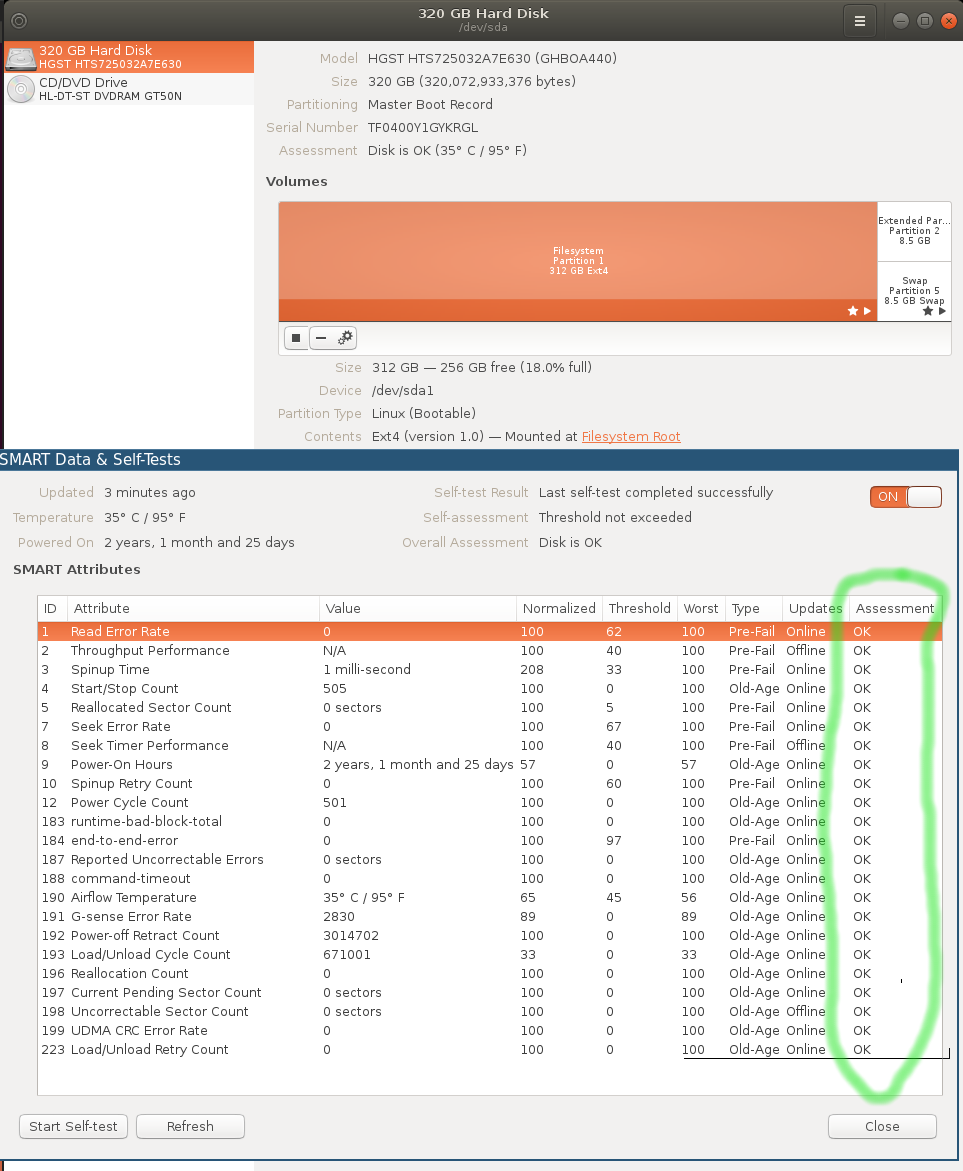
check disk
Install smartctl with sudo apt-get install smartmontools and do a:
$ sudo smartctl -a /dev/sda1 | grep -i old_age
A more visually reassuring output can be produced with the disks Unity program (use as gnome-disks from a terimal):
check for burnt / stuck pixels
research for other useful hardware diagnostics to run (e.g. provided by the manufacturer)
install additional drivers (from Ubuntu Software Center) and upgrade kernel
I noticed some very mild flickering on my screen while watching youtube videos and after establishing it was not Chrome-related (as Firefox exhibited the same behaviour), I decided to install additional drivers and upgrade the kernel. In retrospect I don't believe these two measures alleviated the flickering (at least not markedly). At any rate it is borderline imperceptible so I didn't pursue this issue much further.
I install additional drivers for my Intel video graphics card (I think) using the Unity interface
and the options under system / software sources / additional drivers:

Ubuntu 16.04 uses the 4.4 kernel. I upgraded to 4.6:
$ uname -r
4.6.0-040600-generic
… by following the instructions given here as follows (mutatis mutandis):
cd /tmp/
wget http://kernel.ubuntu.com/~kernel-ppa/mainline/v4.6-yakkety/linux-headers-4.6.0-040600_4.6.0-040600.201605151930_all.deb
wget http://kernel.ubuntu.com/~kernel-ppa/mainline/v4.6-yakkety/linux-headers-4.6.0-040600-generic_4.6.0-040600.201605151930_amd64.deb
wget http://kernel.ubuntu.com/~kernel-ppa/mainline/v4.6-yakkety/linux-image-4.6.0-040600-generic_4.6.0-040600.201605151930_amd64.deb
sudo dpkg -i *.deb
Basically, download the packages you need from here and install them using
sudo dpkg -i *.deb.
check both VGA and DisplayPort video outputs
check battery
NB: be sure to execute this step first
Apparently a number of Lenovo laptops (thankfully not the one I purchased) are equiped with faulty Panasonic batteries (local printed copy here).
So, you might want to check that as well. The following incantations provide helpful information:
$ upower -e
/org/freedesktop/UPower/devices/line_power_AC
/org/freedesktop/UPower/devices/battery_BAT0
/org/freedesktop/UPower/devices/DisplayDevice
$ upower -i /org/freedesktop/UPower/devices/battery_BAT0
Also, the fwts program actually tests the battery:
sudo apt-get install fwts
sudo fwts battery
… in my case the fwts results weren't stellar but I decided to keep the battery (life's too short, one can't afford to get lost in rabbit holes all the time). As a matter of fact I have actually already encountered one case where the battery wasn't charging even though the laptop was plugged-in (this was solved by a full shutdown of the machine and a restart so I let it go at that).
install git and setup my environment
install Node and npm
I installed Node 6 (Node 7 is still in active development) and npm by following the offical instructions and simply doing:
curl -sL https://deb.nodesource.com/setup_6.x | sudo -E bash -
sudo apt-get install -y nodejs
… which resulted in the following situation in my system:
$ node --version
v6.9.1
$ npm --version
3.10.8
Apparently there was a problem with these instructions in the past but now they are working fine — see my comment on this answer.
install Java SDK
sudo add-apt-repository ppa:webupd8team/java
sudo apt update; sudo apt install oracle-java8-installer
After the above stanza I had:
$ java -version
java version "1.8.0_111"
Java(TM) SE Runtime Environment (build 1.8.0_111-b14)
Java HotSpot(TM) 64-Bit Server VM (build 25.111-b14, mixed mode)
mperdikeas@mp-t420:~/js-react-minesweeper#
$ javac -version
javac 1.8.0_111
install PostgreSQL
I installed PostgreSQL out of the official Ubuntu repo simply using:
sudo apt-get update
sudo apt-get install postgresql postgresql-contrib
The version installed was 9.5.5 as evidenced by:
sudo -u postgres psql postgres -c 'SELECT version()' | grep PostgreSQLYou may run the above incantation fresh out of the install without changing anything provided ofcourse you have sudo privilleges.
I verified that the UNIX user postgres was locked as it ought to be:
$ sudo passwd -S postgres
postgres L 11/12/2016 0 99999 7 -1
I then asked PostgreSQL to tell me the location of the data directory and the location of the pg-hba.conf file:
$ sudo -u postgres psql -c 'show data_directory'
        data_directory
------------------------------
 /var/lib/postgresql/9.5/main
(1 row)

mperdikeas@mp-t420:~#
$ sudo -u postgres psql -c 'show hba_file'
               hba_file
--------------------------------------
 /etc/postgresql/9.5/main/pg_hba.conf
(1 row)
Following the above, I edited the file pg_hba.conf (in the above) location to contain the following (so I can run my create database / drop database scripts with no hassles):
# Database administrative login by Unix domain socket
local   all             postgres                                trust
# TYPE  DATABASE        USER            ADDRESS                 METHOD
# "local" is for Unix domain socket connections only
local   all             all                                     trust
# IPv4 local connections:
host    all             all             127.0.0.1/32            md5
# IPv6 local connections:
host    all             all             ::1/128                 md5
NB: the above is slightly different than what is written here as I changed the method to trust for the postgres user as well.
install Ant
sudo apt-get update
sudo apt-get install ant
built and install Ivy from sources
I decided to built Ivy from the sources so that I might be in position to insert some logging code in case I encounter any difficult to resolve problem.
I installed IVY by following the instructions (to build from sources) on this page and doing:
git clone https://git-wip-us.apache.org/repos/asf/ant-ivy.git
git checkout tags/2.4.0
ant jar
cp build/artifact/org.apache.ivy_2.4.0.final_20161112135640.jar ~/.ant/lib/
… otherwise if you fail to check out the stable 2.4.0 tag, then the master branch version 2.5.0.alpha will be built.
install TrueCrypt or other privacy software
sudo apt-get install dmsetupdmsetup is now no standard application, so you must install it explicitly (source).