I wanted to develop a backend application (rest API) using NestJS but read that it requires Node version ≥16. Given previous complications when trying to upgrade the version of Node, I decided to use nvm this time as that would allow me to have multiple versions of Node (and associated versions of npm) on my system.
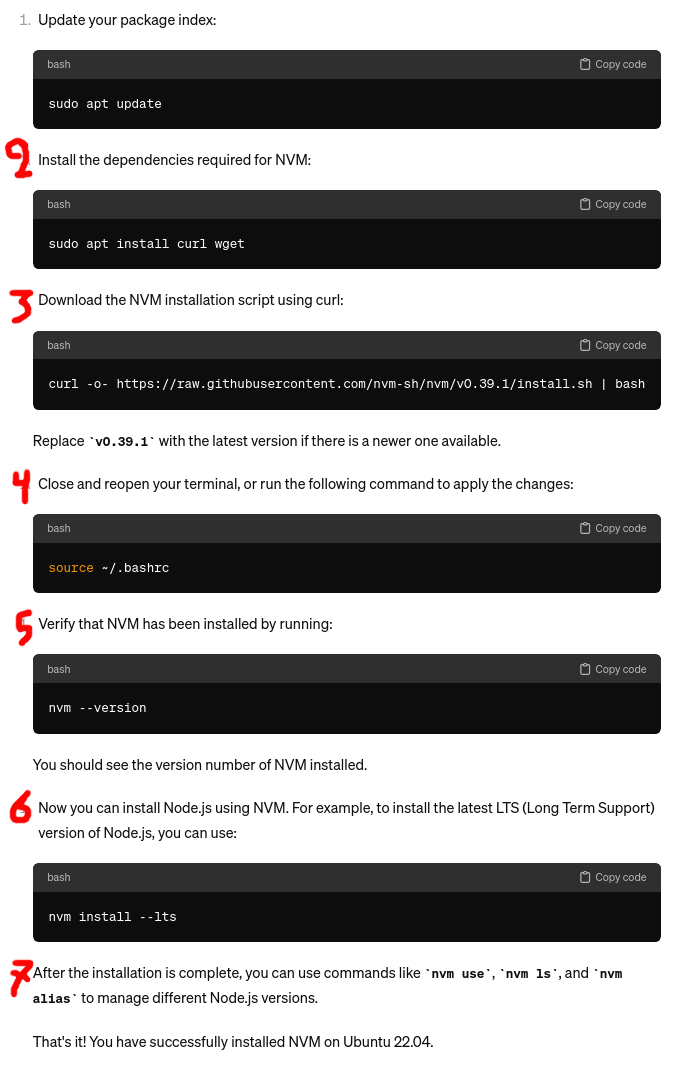
I followed the instructions from ChatGPT which read as follows:
I had to correct the numbering because ChatGPT numbered all sections as 1 and obstinately
refused to number them correctly.
I actually skipped steps 1 and 2 (no ill effects as I already had curl and wget installed in their latest versions). More importantly, before attempting to install nvm I did the following:
- I established and recorded somewhere that the currently available version of Node (with which all existing applications work fine) was v14.21.3 which is also, BTW, the latest version available on the official Ubuntu 22.04 repos.
- removed the existing Node installation:
sudo apt purge nodejs
Also, at first I followed some other instructions so I attempted to install nvm using a different script:
curl https://raw.githubusercontent.com/creationix/nvm/master/install.sh | bash… but when installation of the above script failed with:
You have $NVM_DIR set to "~/.nvm", but that directory does not exist.
Check your profile files and environment.
… I used the ChatGPT instructions even though —unbeknowest to me at that point— I encountered the exact same problem with the ChatGPT instructions too (and eventually solved it).
Before executing step 3 in the ChatGPT instructions I established that the latest nvm version at that time was actually 0.39.2 so I executed step 3 as follows:
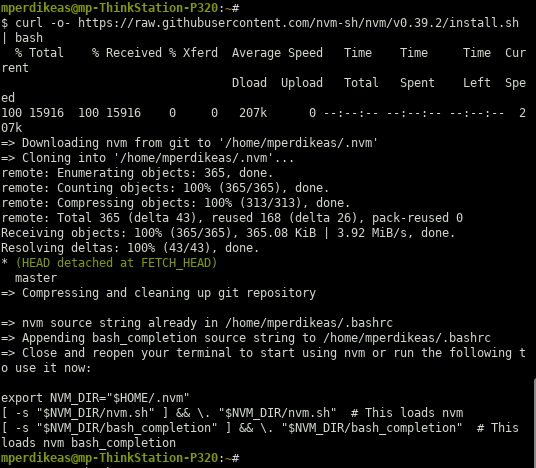
curl -o- https://raw.githubusercontent.com/nvm-sh/nvm/v0.39.2/install.sh | bash
However the above failed with the same message as before:
You have $NVM_DIR set to "~/.nvm", but that directory does not exist.
Check your profile files and environment.
Curiously, even when I manually created the ~/.nvm directory prior to running the above script, it failed again, with the exact same message even though such a directory (empty) now clearly existed. Let it also be recorded that I, very consciously, resisted the tempation to install nvm under sudo privilleges as nvm is meant to be run be ordinary users.
I then explored what is the value of the NVM_DIR variable. It gave the following:
$ echo $NVM_DIR
~/.nvm
This variable is apparently declared in ~/.bashrc and has been there for quite some time (most likely as the result of a previous nvm installation). I speculated then that perhaps some script is run as a user other than mperdikeas so I explicitly exported this variable on the shell substituting ~ for mperdikeas:
export NVM_DIR=/home/mperdikeas/.nvm
After the above, I re-run the installation script and this time it completed successfuly
so that was the root of the problem:
After this last step, there were some conflicting / confusing instructions I encountered only. First of all, some said that the installation script modifies file ~/.profile. However, I noticed no such modification. Then some said that I have to source ~/.bashrc before I can use nvm. I tried that but I had a problem in my ~/.bashrc script and it failed. Eventually I sourced the ~/.nvm/nvm.sh file and then I was indeed able to run nvm. However, I couldn't afford to be doing that on every shell I opened. Also, I noted at that time that the nvm installation script had indeed modified the ~/.bashrc file. Finally I noticed that, even after the script modifications to ~/.bashrc, when opening other shells I would get:
$ nvm --version

Command 'nvm' not found, but there are 13 similar ones.
In the end after some googling I had the following three lines added
in my ~/.bashrc file (click the image link for the text)

I do believe (with 95% certainty) that the last line (line no 282) was
added automatically by the script and that the first two lines (lines no 278-9)
were manually added by me. After that, I was able to remove the following two older lines
which I had added in some past experimantation with nvm:

After that, I had nvm available in all new shells. So this concludes the nvm installation part proper.
Following that I installed the below two versions of node:
nvm install --lts
and …nvm use lts/fermium
I then grew tired of having to type:
nvm use lts/fermiumevery time I wanted to use the existing applications and so did a:
nvm alias default lts/fermiumin some random shell. Following that in every new shell I opened I had v14.21.3 as the default Node version while also being able to do
nvm use lts/ironwhen wanting to play with NestJS.
And there the matter rests having been successfully concluded.
Initially, I tried to follow the instructions given here:
This set of instructions will install whatever version is the latest LTS version.
When a new version is released, you may have to run these instructions again to
 pull the new install script for the new version.

# As a user with sudo
curl -fsSL https://deb.nodesource.com/setup_lts.x | sudo -E bash -
sudo apt-get install -y nodejs

# As root
curl -fsSL https://deb.nodesource.com/setup_lts.x | bash -
apt-get install -y nodejs
However, upon executing the script I encountered the following warning:
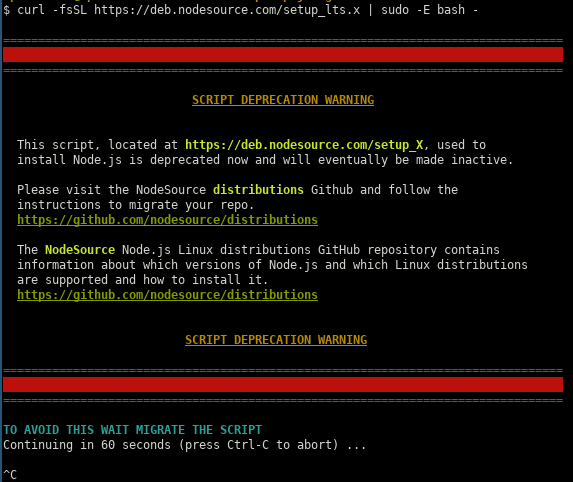
As a result of the above warning, I killed the script and followed (as advised) the instructions given here.
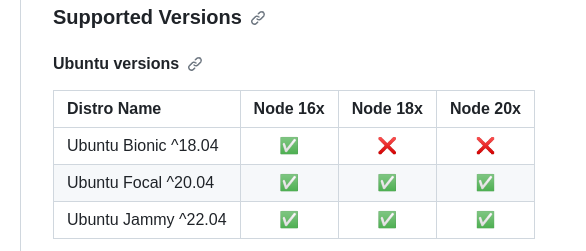
First off, I checked that the latest suport Node version for my Ubuntu system (which is 20.04)
was Node 20x:
I then followed the instructions given below to first download and import the Nodesource GPG key:
sudo apt-get update
sudo apt-get install -y ca-certificates curl gnupg
sudo mkdir -p /etc/apt/keyrings
curl -fsSL https://deb.nodesource.com/gpgkey/nodesource-repo.gpg.key | sudo gpg --dearmor -o /etc/apt/keyrings/nodesource.gpg
… then to create the deb repository (where I used NODE_MAJOR=20):
NODE_MAJOR=20
echo "deb [signed-by=/etc/apt/keyrings/nodesource.gpg] https://deb.nodesource.com/node_$NODE_MAJOR.x nodistro main" | sudo tee /etc/apt/sources.list.d/nodesource.list
… and finally I run update and install as instructed:
sudo apt-get update
sudo apt-get install nodejs -y
Unfortunately, after all this effort I discovered that the new node version breaks the build of a very crucial application (IACS) so I had to downgrade back to Node 14 (which is where I started off) by doing the following:
- purge Node:
sudo apt purge nodejs
- Installing an older version of Node by following the instructions given here.
After that (during which process I ignored all deprecation warnings which incidentally hadn't appeared the last time I run this script), I was back where I started:
$ node --version
v14.21.3
mperdikeas@mp-ThinkStation-P320:~/repos/prj/cognitera-iacs/iacs-ui#
$ npm --version
6.14.18
… and my application build worked as before. I also verified that this is the correct correspondance between Node and NPM versions. See also here.
That would have been the end of the travail for a neurotypical person, but not for me. I subsequently carried away and decided to see whether I can upgrade to the latest version of npm by using:
sudo npm install -g npm@latest
Unfortunately the above failed badly as when I tried to run npm I got:
ERROR: npm v10.2.0 is known not to run on Node.js v14.21.3. ...I.e. I had managed to upgrade to npm version 10 but that version was incompatible with the Node version 14 I am using. Furthermore, I was unable to use the following to downgrade back to the compatible npm version for my version of Node:
$ npm install -g npm@6.14.18In fact the error message was exactly the same, I wasn't even able to run npm --version.
In the end, I was left with no other option available than to repeat the entire ordeal once again, i.e. purge Node (this also purges npm as part of the process) and re-install Node version 14 (which also installs npm version 6 as part of the process). This went smoothly (like the first time) and I was now back to where I started two hours later but with one important realization: That Node and npm are inextricably tied together and that I should never bother with installing npm independently. Just accept the version that comes bundled with Node.
However, there's more to it. At (what I thought was) the end of this ordeal I had the following:
        $ node -v
        v14.21.3
        $ npm -v
        6.14.18
Unfortunately, every time I tried to run npm I got:
$ npm install -g npm@6.14.17
TypeError: isexe is not a function
    at E (/usr/lib/node_modules/npm/node_modules/which/which.js:82:7)
    at F (/usr/lib/node_modules/npm/node_modules/which/which.js:91:7)
    at which (/usr/lib/node_modules/npm/node_modules/which/which.js:92:5)
    at load (/usr/lib/node_modules/npm/lib/npm.js:250:5)
    at EventEmitter.npm.load (/usr/lib/node_modules/npm/lib/npm.js:246:5)
    at /usr/lib/node_modules/npm/bin/npm-cli.js:79:7
    at Object. (/usr/lib/node_modules/npm/bin/npm-cli.js:155:3)
    at Module._compile (internal/modules/cjs/loader.js:1114:14)
    at Object.Module._extensions..js (internal/modules/cjs/loader.js:1143:10)
    at Module.load (internal/modules/cjs/loader.js:979:32)
/usr/lib/node_modules/npm/lib/npm.js:59
      throw new Error('npm.load() required')
      ^

Error: npm.load() required
    at Object.get (/usr/lib/node_modules/npm/lib/npm.js:59:13)
    at process.errorHandler (/usr/lib/node_modules/npm/lib/utils/error-handler.js:208:32)
    at process.emit (events.js:400:28)
    at process._fatalException (internal/process/execution.js:167:25)
In fact the only npm command I was able to run was npm -v. Googling revealed that this case existed but there was only a single low-visibility question on SO. Incidentally, the question was only a month old pointing to some recent breakage.
I frantically tried the same cycle a couple of times more (i.e. purging Node and then installing version 14) but I kept getting the same results.
In the end, at the point where I was beginning to despair, I decided to follow these instructions which I had also tried near the beginning of this ordeal with the difference this time of setting the NODE_MAJOR environmental variable to something less than 20. So I tried first with 18 but the resultant Node/npm configuration was breaking the build of my IACS application (mentioned above). I then tried with 16 and everything is working fine.
So, at the end of this ordeal I did manage to upgrade the Node/npm versions to the following:
$ node --version
v16.20.2
$ npm --version
8.19.4
update a couple of days later (at 2023-10-17)
Alas, this was not meant to be. A couple of days later I tried to run
the create-react-app application and came across this dreaded
message (which I have often seen before):
$ npx create-react-app cognitera-app-1 --template typescript
npm ERR! must provide string spec

npm ERR! A complete log of this run can be found in:
npm ERR!     /home/mperdikeas/.npm/_logs/2023-10-17T11_42_06_557Z-debug-0.log
… not only that but at further investigation I realized, to my horror, that I could not even run npm install any more as it failed with the exact same message. I came to the awful realization that my previous upgrade (to version 16 of node and version 8 of npm) was broken. Moreover, reading my previous notes in this travail, I further realized in horror that I wouldn't even be able to downgrade to node version 14 as previous attempts had fail. What's more this realization came only after I had opened the gates of Hell with:
sudo apt purge node. I now faced the spectre of a totally broken system with no possibility to ever install node or npm.
However, despite all odds, and despite my previously paintstakingly elaborate notes to the contrary, this time the installation of node 14 miraculously succeeded and was entirely uneventful:
$curl -sL https://deb.nodesource.com/setup_14.x | sudo bash -
 ...
$sudo apt install -y nodejs
 ...
$ node -v
v14.21.3
$ npm -v
6.14.18
… Moreover, I confirmed that I was now able to execute
both npm install
and npx create-react-app
So, eventually, I manage to safely return back to where I had started (for the third time). I have no explanation as to why this time I was able to install Node version 14 even though in the previous attempts I failed miserably. Perhaps the intermediate installation of Node version 16 changed something in the system?
This is is all very unsettling. I think the morale of the story is to be extremely hessitant in updating the node or npm versions of the system. I have also realized that node, npm (and npx too) are inextricably tied together and are installed together as part of the Node installation. The part about npx was confirmed independently by ChatGPT.
(source: https://askubuntu.com/a/1291854) I executed the following commands (May 2022):
sudo apt update
curl -sL https://deb.nodesource.com/setup_14.x | sudo bash -
sudo apt install -y nodejs
node -v
After running the last command I saw:
$ node -v
v14.19.2
However, due to what I am almost confident are broken dependencies issues among my packages, the installation of node messed up my npm and I was unable to re-install it with conventional means. As such, I had to download the node tarball from here, explode the tarball in a directory and set in my PATH the path to node-v14.16.0-linux-x64/bin (wherein the npm executable is to be found). This was mighty iffy and unsettling.
npm install -g npm-check-updates
ncu -u
npm update     # use this if node_modules already exists
npm install    # use this otherwise
I've used the nodemon package for that. See target monitor in package.json in my ora2pg migration assessment github project
I tried this to update to the latest major version and it worked like a charm.
By combining this SO answer with that SO answer, one can arrive at the following solution:
export npm_config_cache=$(shell mktemp -d)

install:
    @printf "using throw-away cache at: [$$npm_config_cache]\n"
    npm install
    @du -h $$npm_config_cache | printf "size of temp cache is: $$(du -h . | tail -1 | cut -f1)\n"
    @rm -fr $$npm_config_cache
    @printf "temporary cache at: $$npm_config_cache is now deleted.\n"

clean:
    rm -fr node_modules/
    rm -f es5/*.js
    rm -f es5/*.map
    npm cache -f clean # this is not really necessary as we're using a throw-away cache
npm run foo --ignore-scriptsnpm publish --ignore-scripts
npm installed)
export NODE_PATH=$NODE_PATH:~/.node_modules_global/lib/node_modules
Notes:
- won't work with "use strict"
- useful for "quick and dirty" using JS libs designed for client-side into a node.js app
var fs = require('fs');
// file is included here:
eval(fs.readFileSync('file-to-include.js')+'');
$ node
> fs = require('fs');
> fs.writeFileSync('fs.js', fs.toString())
> fs.writeFileSync('fs.readFileSync.js', fs.readFileSync.toString())
[Ctrl-C][Ctrl-C]
sudo npm install npm@3 -g
$ npm -version
3.8.0
The following process worked for me on Ubuntu 14.04 and 12.04 and allowed me to install Node.js v4.3.2:
In a sudo shell:
apt-key adv --keyserver keyserver.ubuntu.com --recv 68576280
apt-add-repository 'deb https://deb.nodesource.com/node_4.x precise main'
apt-get update
apt-get install nodejs
NB:I also have node symlinked via "alternatives" to nodejs:
$ ls /usr/bin/node
lrwxrwxrwx 1 root root 22 Mar  7 10:23 /usr/bin/node -> /etc/alternatives/node*
$ ls /etc/alternatives/node
lrwxrwxrwx 1 root root 15 Mar  7 10:23 /etc/alternatives/node -> /usr/bin/nodejs*
- sudo apt-get install ruby-dev
- sudo gem install rdoc -V
- sudo gem install guard -V
- sudo gem install guard-livereload -V
I think actually step 4 was the only necessary step.
I then created the symlinks mentioned in this post below.
the github repo for guard-livereload
I've also created a script to run guard (in
~/playground/repo-wide-scripts).
I the same location I've also created:
- A sample
Guardfile - The
Gemfileto be used
sudo gem install guard-livereloadsudo apt-get install bundlerln -s ~/playground/repo-wide-scripts/Gemfileln -s ~/playground/repo-wide-scripts/Guardfileln -s ~/playground/repo-wide-scripts/run-guard
An example of this properly setup and working well is found in my bouncing ball project (file
run-guard which ultimately
links to this script).
I've made a copy of the document in case the original resource goes offline here
npm tool in the home folder as described
here.
However with this approach, one (at least in Ubuntu 14.04) cannot use the nodejs executable
but has to use the node one that is available with the nvm tool.
This is described here in the section "How to Install Using NVM".
NB:I actually had to use sudo curl .. | sh to install it.
Then don't forget upon installing a package, e.g.
npm prompt to also do nvm link prompt
(as described in the link above). An example is given in:
~/playground/javascript-you-dont-know